How to Take a Passport Photo at Home
Yes — you can take your own passport photo at home. Stand in front of a plain white background in even daylight, have someone photograph you head-on from 4–6 feet away at eye level with a neutral expression, then upload the photo to PassportSelf to crop and position it to the exact document requirements.
Last updated: September 10, 2026 · Reviewed by PassportSelf
Can I take my own passport photo?
Yes. The U.S. Department of State and most other issuing agencies accept photos you take yourself, as long as the photo meets the published requirements.
What matters is the result: correct size, plain background, recent, in focus, unedited, with the right head position. None of that requires a professional studio. Ten minutes and a phone are enough.
Background
Use a plain white or off-white wall, door, or sheet of white poster board with no shadows, texture or lines.
- Stand about a foot in front of the background so your body doesn't cast an outline shadow on it.
- Make sure nothing else (frames, switches, furniture) appears behind you.
- Do not digitally replace the background — U.S. rules prohibit altered photos.
Full rules and tips: passport photo background requirements.
Lighting
Face a window with soft, indirect daylight so your face is evenly lit with no shadows.
- No direct sun, no single overhead bulb, no flash if it casts shadows.
- Avoid mixing warm lamps with daylight — it creates color casts.
- Both sides of the face should be equally bright.
Camera position
Photographer 4–6 feet away, camera at your eye level, held level — not tilted up or down.
- Use the rear camera in standard photo mode — no portrait mode, filters or beauty settings.
- Frame loosely: include your full head and the top of your shoulders with space around — PassportSelf handles the exact crop.
- Take several shots and keep the sharpest, most evenly lit one.
Head position
Face the camera directly with your head centered and square to the lens — no tilting or turning.
For U.S. documents the head must measure 1–1⅜ inches from chin to crown within the 2×2 frame, with the eyes 1⅛–1⅜ inches from the bottom. You don't need to measure anything while shooting — PassportSelf shows these zones as on-screen guides when you position the photo. See the passport photo size guide.
Expression
Neutral expression or a natural, unexaggerated smile — both eyes open, mouth closed.
Keep hair away from your face and eyes. Remove glasses, hats and headphones.
Clothing
Wear normal everyday clothing — no uniforms, and no glasses for U.S. passports. Avoid white tops that blend into the white background.
Head coverings are only allowed for religious or medical reasons, with the full face visible from hairline to chin.
- Free to use
- No account
- No subscription
- Digital photo included
- Printable 4×6 sheet included
Formatted according to supported technical requirements.
Common mistakes
Most home photos fail on lighting or camera position rather than equipment quality.
- Standing against the wall (creates outline shadows) — step forward.
- Selfie-distance shots that distort the nose and face.
- Camera above or below eye level.
- Portrait mode blurring the background — use standard mode.
- Mixed lighting (warm lamp + daylight) creating color casts.
- Photo older than 6 months, or edited with filters.
Uploading to PassportSelf
Upload the photo, choose your document, align your head with the on-screen guides, preview, and download your files.
- Open PassportSelf and choose your document.
- Upload the photo and align your head with the on-screen size and eye-level guides.
- Preview the digital photo and the 4×6 print sheet.
- Download both files immediately, free of charge.

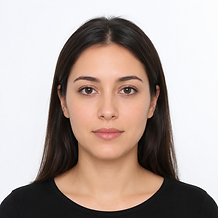
Home photo versus store photo
A home photo costs a few dollars and a few minutes; a store photo costs more and requires a trip — the accepted result is the same.
Pharmacies and shipping stores commonly charge many times more than a self-made photo, and you still have to travel there. The trade-off: at home you are responsible for lighting and background, which is what the steps above help with. If you started out searching for passport photos near you, the home process above is the online alternative.
Frequently asked questions
Is a home passport photo really accepted?
Yes. Government agencies publish technical requirements for the photo, not for where it was taken. A home photo that meets the requirements is treated the same as a studio photo.
Can I take a passport photo with my iPhone?
Yes. Any modern phone camera produces sufficient quality. Use the rear camera when possible, avoid the wide-angle lens, and don't use portrait mode or filters.
Can I take a selfie?
Arm's-length selfies distort facial proportions. Have someone take the photo from 4–6 feet away, or use a tripod with the timer.
Should I use portrait mode or filters?
No. Background blur, filters and beauty modes count as alterations. Use the standard photo mode.
Do I need special equipment?
No. A phone camera, a plain white or light wall, and daylight are enough for most people.
What does PassportSelf cost?
Nothing — the passport photo maker is free to use. You download the digital photo and a printable 4×6 sheet with no account and no subscription.
Does PassportSelf change how I look?
No. PassportSelf crops, sizes and positions your photo. It never uses generative AI, retouching, or background replacement — altering a passport photo can cause rejection.
- Free to use
- No account
- No subscription
- Digital photo included
- Printable 4×6 sheet included
Formatted according to supported technical requirements.